- Open UDOIT Accessibility
- Select the Scan Now button located on the far right
- Understand how to fix the errors and address the suggestions below
- Click on Settings on the left side bar in the course you’d like to activate UDOIT Accessibility
- Click on Navigation from the top menu
- Scroll down and find “UDOIT Accessibility”
- Drag and Drop “UDOIT Accessibility” towards your activated apps, and place it anywhere you’d like, students will not see UDOIT Accessibility on their dashboard.
- Make sure to click Save after placing UDOIT Accessibility in the desired spot.
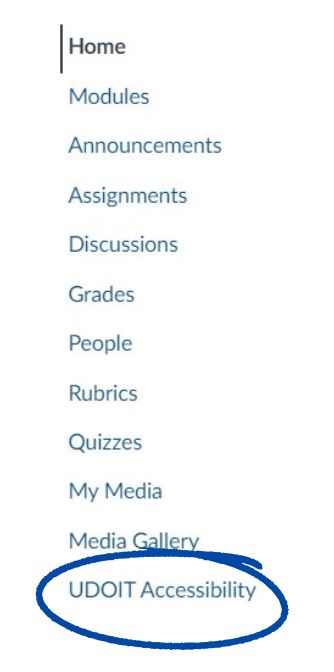 Once the steps above have taken place, you will see UDOIT Accessibility on your navigation bar. The screen shot included on this page shows UDOIT Accessibility circled at the bottom of the navigation bar list.
Step 1: The UFIXIT area of UDOIT Accessibility is where you review and address the issues found by the tool in your course. Issues will have one of the following statuses:
| Icon | Status |
|---|---|
| Error | |
| Suggestion | |
| Needs Review (Files) | |
| Fixed / Resolved / Reviewed |
Step 2: In the UFIXIT area, you can sort the list of issues, or further filter the list by opening the Filter options menu.
Step 3: Click on an issue in the list to view the details about the error or suggestion and where it occurs in the course.
Note: In many cases, you can fix the issue within the issue detail window and click Save. In some cases, an issue cannot be fixed within UDOIT, but you can mark the issue as Resolved once you have addressed it outside of UDOIT and/or determined it is no longer an issue.
Step 4: The Summary bar at the top of the UFIXIT area will continue to reflect the number of issues that are outstanding and addressed to give you a sense of the progress that has been made. To work on another set of issues, you can either change the Filters in the UFIXIT area, or return to the Home page and select another pre-built filter.
UDOIT scans the following content items in a course:
- Announcements
- Assignments
- Discussions
- Pages
- Syllabus
- Module URLs
Check out the tips for specific Canvas Accessibility Errors and Suggestions below!
Here are a few important terms to be aware of as you familiarize yourself with UDOIT Accessibility:
- Alternate Format
- Umbrella term that typically includes an alternate to printed text, in the instance of UDOIT Accessibility it includes: Canvas Page (includes HTML file), HTML File, ePub Digital Book, Plain Text, Audio File (MP3) (includes HTML file), or an Auto Tagged PDF.
- Errors
- Issues that must be addressed to be considered accessible.
- File Issues
- The current number of issues found in the UDOIT file scanning process that have not been remediated.
- Files Remediated
- The number of files that have had some action performed on them in UDOIT. For example, replacing, updating, or deleting a file.
- Files Reviewed
- The number of files that have been marked “Reviewed” – a status that can be given to a file when a user selects the “Mark as Reviewed” checkbox to indicate that they have reviewed a file for accessibility.
- Issues Fixed
- A status assigned to an issue when UDOIT can verify that the error or suggestion has been addressed. Issues that generally should be addressed but may be ignored under certain circumstances.
- Resolved
- A status that can be given to an issue when a user selects the “Mark as resolved” checkbox for issues that cannot be fixed within UDOIT to indicate that they have addressed the item outside of UDOIT and/or that it is no longer an issue.
- Suggestions
- Issues that generally should be addressed but may be ignored under certain circumstances.
- Total Files
- The total number of files that were found in the course by the UDOIT scan.
UDOIT HOME PAGE
The UDOIT Home page provides summary information to help you keep track of the number of issues that have been found, as well as how many have been addressed.
This summary is split into:
- Content: Canvas content such as Pages, Assignments, Announcements, Discussions, Quizzes, HTML Files, and the Canvas Syllabus.
- Files: Word Documents and PDFs. (Note: Files Individual image files are not included in UDOIT’s Files, as their accessibility considerations are handled within the Content pages.)
The Home page also provides a number of ways to view a subset of issues, so they can be reviewed as a smaller and more manageable set. Each link on the page is essentially a shortcut to a filtered list of issues to review.
This is especially helpful for users who may not be familiar with accessibility and could find the full list of issues overwhelming. It also helps users focus on issues that are the same or similar type which makes the process of fixing them all in a similar way easier and more efficient.
In addition to clicking any of the “Most Common” links to view related instances, users can also choose how to interact with UDOIT by selecting any of the Ways to Get Started on the right. Once you make your selection, you will be moved to the U FIX IT tab.
= our recommended methods for beginners!
EASIEST TO FIX
Recommended! These are errors that can be quickly remediated by the user from within the UDOIT interface.
ERRORS ONLY
This will bring up a list of all errors in the course, of all types.
ALL OPEN ISSUES
This will address everything in the course in one long list. We lovingly call this one “the firehose approach.” It is suitable for your advanced users, but not preferable for those just getting started with the tool.
BY ISSUE TYPE
Recommended! This is an extremely helpful workflow for faculty and content designers. They can focus in on one particular issue, for example, providing Alternative Text for images, and work through each instance of this issue that appears in their course.
Because they are dealing with the same type of issue over and over, without interruption, the cognitive load is reduced, and they become quickly familiar with the task at hand. We find users progress quickly through their remediations when addressing content in this manner.
BY CONTENT TYPE
This option allows you to work through all errors found within a typical type of content in Canvas. As a theoretical example, you could ensure that all of your Pages are accessible first, since you know your students will be viewing pages in Week 1, but perhaps won’t be accessing Discussions, Assignments, or Quizzes until Week 2.
BY IMPACT TYPE
Recommended! This option allows faculty and content designers to create “just in time” remediations for specific accommodation requests that may arise. Users can sort by the following issue types:
- Visual
- Auditory
- Cognitive
- Motor
If a faculty member learned of a student requiring visual accommodations joining their course, they could dial into the most effective remediations for that student first.
Adjacent links that have the same URL should be combined into one. Links should be merged in the LMS content editor.
Alternative Text should not be empty.
Alternative Text (Alt Text) is an alternative (non-visual) way to describe the meaning of an image. Please provide a brief description of the image for a screen reader Links to an external site. user.
Learn more at WebAIM.org: Alt Text Accessibility Links to an external site.
Alternative text or “alt text” is a brief, 100-125 characters long, description of an image. This description is extremely important when students come across an image that has become suddenly unavailable and when students who rely on a text-to-speech or screen reader program to navigate the web access your course content. In the former case, the alt text is visible to any sighted person. In the latter case, the alt text is read aloud or translated to braille.
If the alt text or brief description of an image is too long, it may not appear correctly in the placeholder for the unavailable image. More importantly, if a student uses an older text-to-speech or screen reader program to access the image, the screen reader may only read the first 100-125 characters of an alt text description. This description provides access to the images to your course. It should not be the file name.
To get this UDOIT result, you must have one or more images with no alt text, alt text that is longer than 100 characters (numbers, letters, and spaces) long, or the image is linked with the file name (ex. logo.png)
Incorrect Example
![]()
Correct Example
![]()
HOW TO FIX IT:
Write a descriptive Alternate Format Text (AFT) for the image in the UFIXIT field or follow the steps below:
- Click on the image.
- Click on Image Options.
- Type the appropriate description in the Alt Text box.
- Click on Done.
- Click on Save.
Remember, the alt-text should be 100-125 characters long and should not be just the file name. If you need to describe more, consider providing a note to your students in the plain text near the image.
Related Errors:
Decorative Images Should Have Empty Alternative Text
This image was marked as decorative in the Rich Content Editor, but the ALT attribute contains text. Please remove the alternative text or the decorative marking.
Learn more at WebAIM.org: Alt Text Accessibility Links to an external site.
Image Description is Too Long
Any image that has an ‘alt’ attribute that does not fully convey the meaning of the image should have a ‘longdesc’ attribute.
Image Elements Should Have an “alt” Attribute
Alternative Text (Alt Text) is an alternative (non-visual) way to describe the meaning of an image. Please provide a brief description of the image for a screen reader Links to an external site. user.
Learn more at WebAIM.org: Alt Text Accessibility Links to an external site.
Any image that is not used decoratively or which is purely for layout purposes cannot have an ‘alt’ attribute that consists solely of placeholders. Placeholders include: nbsp , , spacer , image , img , and photo .
Learn more at WebAIM.org: Alt Text Accessibility Links to an external site.
Links should be checked to ensure that they still function. This could be temporary, so please verify and repair the link if necessary.
Audiovisual multimedia can present accessibility concerns for students with hearing disabilities. Accommodations such as captions give equal access to this content. They can also give students without disabilities a better learning experience; for example, if they are not native English speakers, are sitting in a noisy room, or simply learn better through reading.
For proactive planning, address the following in all of your audio/video content:
- Captions: Use Canvas “My Media” to generate captions for video uploads that are directly connected to DU’s Kaltura Media Space. Captions need to be reviewed and edited for accuracy. This OTL Knowledge Base Article on Editing Closed Captions might be helpful to you.
- Transcripts: For audio files like podcasts and instructor-recorded assessment feedback, you can also use the DU’s Kaltura Media Space to upload media files and receive a transcription.
- Recommendations for live online classes:
- Use the live captioning tool in Zoom
- Have only one person speaking at a time (use the “hand raise” tool in Zoom)
- Ask all speakers to self-identify before speaking
- Ask speakers to repeat their statement if there are any audio issues
WHY IS THIS IMPORTANT?
If videos do not have captions (and audio-only content do not have transcripts), students may be unable to consume the media you’ve included in your course.
CAUSE OF ERROR
This result can appear as an error or a suggestion.
- Error– To get the error, you will need to have added a YouTube video or a link to a YouTube video to your course content that has automatically generated captions. Follow this OTL Knowledge Base article, Editing Captions for YouTube Videos using Kaltura MediaSpace.
- Suggestion– To get the suggestion, you will need to add a non-YouTube video or link to a non-YouTube video to your course. The reason that this generates a suggestion instead of an error is that UDOIT can’t detect if a non-YouTube video has captions or not.
Not all videos will be checked by UDOIT. The following will need to be checked manually:
- Recordings added with the Record/Upload Media button in the Rich Content Editor toolbar.
- Kaltura videos added via My Media and shared via Media Gallery
- YouTube videos that have no captions whatsoever–not even automatically generated captions.
- Most video/audio hosted on websites other than YouTube and Vimeo.
Tip: Most might know what an uncaptioned video and a captioned video look like, but not everyone understands how automatically generated captions (auto captions) are insufficient substitutes for human-made captions in most cases. Please feel free to check out this Taylor Swift Caption Fail , a humorous example of auto caption’s poor quality.
FALSE RESULTS
There are four ways to get false positives:
- (Most Common) A captioned Vimeo video is linked or embedded in your course.
- An open-captioned video or video with captions burned into the visuals of the video is linked or embedded in your course (similar to the video above).
- A YouTube video using an edited auto caption file instead of a separate, man-made caption file is linked or embedded in your course.
- A link containing the word Vimeo in the URL is inserted in your course.
In all of the above cases, the UDOIT error or suggestion may be ignored.
It is also possible to get false negatives for this result. UDOIT primarily examines YouTube and Vimeo videos.
HOW TO FIX IT
There is no UFIXIT, Rich Content Editor, or HTML solution for this issue. There are captioning services available through Kaltura DU Media Space (which DU provides to all faculty, staff, and students).
Note: Note:UDOIT is unable to scan Private or Unlisted YouTube Videos. At times, UDOIT is also unable to verify captions because the API Key has been exhausted of credits.
Audiovisual multimedia can present accessibility concerns for students with hearing disabilities. Accommodations such as captions give equal access to this content. They can also give students without disabilities a better learning experience; for example, if they are not native English speakers, are sitting in a noisy room, or simply learn better through reading.
For proactive planning, address the following in all of your audio/video content:
- Captions: Use Canvas “My Media” to generate captions for video uploads that are directly connected to DU’s Kaltura Media Space. Captions need to be reviewed and edited for accuracy. This OTL Knowledge Base Article on Editing Closed Captions might be helpful to you.
- Transcripts: For audio files like podcasts and instructor-recorded assessment feedback, you can also use the DU’s Kaltura Media Space to upload media files and receive a transcription.
- Recommendations for live online classes:
- Use the live captioning tool in Zoom
- Have only one person speaking at a time (use the “hand raise” tool in Zoom)
- Ask all speakers to self-identify before speaking
- Ask speakers to repeat their statements if there are any audio issues
If videos do not have captions (and audio-only content does not have transcripts), students may be unable to consume the media you’ve included in your course.
Types of Captioning Errors
There is no UFIXIT, Rich Content Editor, or HTML solution for this issue. There are captioning services available through Kaltura DU Media Space (which DU provides to all faculty, staff, and students).Links to an external site.
Closed Captions Cannot Be Checked
Videos used in online courses are required to have closed captioning. Unfortunately, some video services do not provide an API for checking captions and will need to be manually verified.
Closed Captions Do Not Match Course Language
While this video has captions, there are no captions available for your course language. While not imperative to fix, if you’d like to you have three options:
- Contact the creator of the video and request captions in your course language be added.
- Create captions yourself using DU Kaltura Media Space. Reach out to kalturaAdmin@du.edu with questions.
- Find a different video that has closed captioning for your course language.
Closed Captions Were Auto-Generated
Captions that are machine-generated by a service like YouTube are rarely if ever fully accurate and should not be relied upon for educational use.
No Closed Caption Found
Captions should be included in the video to provide dialogue to users who are hearing impaired. (Please note that videos that have been removed, deleted, or Unlisted will also cause this error, and will need to be manually verified.)
AVOID USING COLOR ALONE FOR EMPHASIS
When emphasizing text, you may use color with sufficient contrast as long as you also apply some other form of emphasis, such as bold or italics. This ensures that screen reader users are aware of the text’s importance.
WHY IS THIS IMPORTANT?
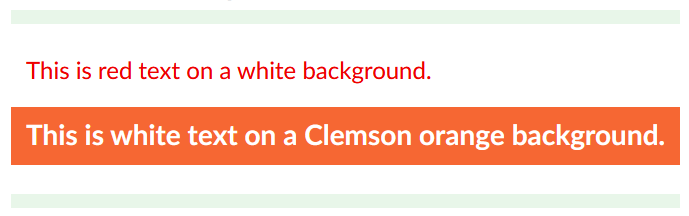
When text does not have a strong enough contrast with its background, it is unreadable. Additionally, when a student with color-deficient vision due to a mechanical failure or a biological condition perceives, for example, red text (#FF0000) on a white background (#FFFFFF) as yellow text on a white background, the text is also unreadable. Because of this, there are certain color contrast ratios that must be met.
CAUSE OF ERROR
To get this UDOIT result, you will need to have one or more portions of colored text that has less than a 4.5:1 contrast ratio with white (#FFFFFF;), the assumed background color.
EXAMPLES
The following color combinations may appear readable to many, but some may see the colors as shades of yellow. To correct the issue, only a slight change in color or in the text’s font size and weight had to be made.
Incorrect

Correct
FALSE POSITIVES AND NEGATIVES
Unfortunately, UDOIT is not programmed to detect font size or background color (it’s assumed to be white) which can lead to both false positives and false negatives.
To get a false positive (UDOIT results which can be ignored), the following must be true:
- For large text (size ≥14pt bold or ≥18pt), have a contrast ratio of 3:1 or greater between the background color and font color.
- For regular text, have a contrast ratio of 4.5:1 or greater between the background color and font color.
To get a false negative, you need to have text on a colored background which has a 4.5:1 contrast with white but does not have the appropriate contrast ratios listed above for the colored background.
For information about how to identify false results, read More on Color ContrastLinks to an external site..
Within UDOIT, if you click the U FIX IT! button, you will be provided with:
- a sample of the current color combination
- a checkbox that allows you to bold the font
- a checkbox that allows you to italicize the text
- a selection of colors.
The checkboxes are provided so that when you change the color, you can also address the Avoid using color alone for emphasisLinks to an external site. suggestion. It’s strongly recommended that when you do use the checkboxes use the one for bold instead of italics as italics are generally harder to read.
Below the checkboxes are a collection of color swatches. You may choose any that do not generate an x when hovered on. Below, I’ve replicated your choices. The ones with X or / on them cannot be selected in UDOIT, but the ones with a / can be used on large text if you want to copy the color code and apply that color via the HTML directions. Additionally, please avoid using blue shades for non-linked text.
![]()
Click on a more accessible color then click the Submit button and UDOIT will apply the change.
External links are usually embedded and shared throughout Canvas courses to share resources, websites, and multi-media files. Ensuring that these links are descriptive are important for digital accessibility.
Descriptive link text is a form of hyperlink where the link’s text provides clear and meaningful information about the destination or purpose of the link. Instead of using generic phrases like “click here” or “read more,” descriptive link text offers users a concise summary of what they can expect when they follow the link.
For example:
Non-Descriptive Link Text: “Click here to learn more.”
Descriptive Link Text: “Learn more about our classroom resources by visiting the resource tab.”
WHY IS THIS IMPORTANT?
If there is no text or image in the link, students will have:
- Nothing to click on (if the link was to another place in Canvas)
- An unexplained icon to click on (if the link is to an external website)
- A link without any information about the destination (if the link is accessed by a student using a text-to-speech or screen reader technologies).
- A long https:// link that is not descriptive or helpful for text to speech or screen reader users.
CAUSE OF ERROR
To get this UDOIT result, you will need to have one or more links that do not contain text or do not contain images with alt text. The most common ways to reach this error are to:
- rearrange lists of links.
- delete linked text or images without also deleting the link.
UDOIT can tell when there is an empty link because the code will look like one of the following (the […] will vary):
HOW TO FIX IT
Within UDOIT, if you click the Review button, you will be provided with:
- A text field where you can enter in New link text (the text that students will see).
- A Delete this Link completely instead checkbox.
To determine the correct route, click the View the source of this issue, copy the URL that appears between href=” and “, open a new tab, paste the URL in the address bar, and then view the website. If you also need to verify that the link is available elsewhere on the page where the issue was found, you can click on the page title located in the light gray box at the top of this section of results to open the page in a new tab.
After you’ve determined the correct location of the link and have either filled the field or checked the checkbox, click the Submit button and UDOIT will apply the change.
Links Should Contain Text
Because many users of screen readers Links to an external site. use links to navigate the page, providing links with no text (or with images that have empty ‘alt’ attributes and no other readable text) hinders these users.
Canvas has a variety of built-in styles and layouts that allow for accessible design. All text in your course, including main body text, headers, and links, should be as clear and concise as possible.
To be proactive in your design, use different heading levels (Heading 1, 2, 3, etc.) to clearly mark sections of your course and indicate how content is ordered and related. To understand this error in your UDOIT scan, read more below.
WHAT IS A HEADING?
A heading is a title for a section of text that, when correctly formatted, can be used to create electronically generated outlines (via tools like HTML5 Outliner and HeadingsMap) and be used to more easily navigate the webpage (via keyboard commands in a text-to-speech or screen reader program commonly used by visually impaired persons).
For example, within this accordion there are four headings included, with paragraph text below. These allow the reader to understand the reading order, flow, and division among sections of content/information.
Nest headings by their rank (or level). The most important heading has the rank 1 (h1) in HTML files or rank 2 (h2) in Canvas pages, the least important heading rank 6 (h6). Headings with an equal or higher rank start a new section, headings with a lower rank start new subsections that are part of the higher ranked section. Skipping heading ranks can be confusing and should be avoided.
WHY IS THIS IMPORTANT?
Clear and consistent headings make it easier for all users to comprehend the content and find what they are looking for quickly. Well-structured headings create a logical hierarchy, allowing readers to scan the page and understand the relationships between different sections.
Proper heading structure aids screen readers and other assistive technologies in understanding the organization of content. This enables users with visual impairments or other disabilities to navigate the page effectively and access the information in a meaningful sequence.
Headings should contain text. Sighted and screen reader Links to an external site. users depend on headings to organize the content on the page. Headings should not be empty and should represent an accurate outline of the content
CAUSE OF ERROR
To get this error, you usually have created a heading via the Paragraph drop menu but either:
- Forgot to add text.
- Deleted the text, but not the line.
- Moved an entire section, including the title, and the heading format was left behind.
- Placed the cursor at the start of the heading and created a new line.
HOW TO FIX IT
Within UDOIT, if you click the U FIX IT! button, you will be provided with
- A New heading text field.
- A Delete this Header completely instead checkbox.
If you’re confident that this empty heading should be deleted, check the checkbox and then click the Submit button.
Tip: If you’re not really sure if it should be deleted, put “xxx” in the New heading text field and click the Submit button. Then click the page title above this result to open the page where the issue was located. Once there, look for the xxx heading and determine if you still need it. If you don’t, delete the xxx and the line they were on then save the page. If you do need the xxx heading, replace the xxx with the appropriate text and then save the page.
Tables are often used in Canvas courses to organize information, such as due dates, assignments, etc.
WHY IS THIS IMPORTANT?
- Tables without properly identified header cells can be hard to interpret and navigate for students who rely on text-to-speech or screen readerLinks to an external site. programs to convey visual information. When students using these programs come across tables that identify header cells and use the scope attribute correctly, it is easier to track which row and column a given cell is describing. Table headers provide a description of the table structure for sighted and screen reader users.
- Tables without properly identified scopes can be hard to interpret and navigate for students who rely on text-to-speech or screen reader programs to convey visual information. When students using these programs come across tables that identify header cells and use the scope attribute correctly, it is easier to track which row and column a given cell is describing.
CAUSE OF ERROR
- To get this UDOIT result, you will need to have one or more tables in the course that did not have at least one row or column where the Cell Type under Cell Properties was changed to Header cell.
UDOIT identifies such tables because all of the cells of the first row or column do not have tags in the HTML.
- To get this UDOIT result, you will need to have one or more tables in the course that have at least one header cell where the Scope under Cell Properties was not changed to either Row or Column.
TRUE POSITIVES AND FALSE POSITIVES
True Positive: If you built the table in the HTML Editor or if you edited the HTML of a table and set the scope of one or more header cells to scope=”column” you will receive this error in UDOIT because you need to have a scope=”col” instead of scope=”column”.
It’s a very easy mistake to make, so don’t feel bad if you make it.
False Positive: If your table is meant to create a visual layout instead of organizing and conveying data, then you should ignore this result. The Header cell Cell Type should only be put on data tables.
If you know or can find someone who knows HTML, it is strongly recommended that layout tables be replaced with divs as soon as possible. Divs can be given display attributes to achieve the same or similar yet improved layouts and won’t be confused for data tables or flagged by UDOIT.
While we would encourage that you do not use a table that has merged or split cells, if you must have them and they are header cells you will need to use the scopes Row group or Column group. However, neither scope will be recognized as acceptable scopes in UDOIT. As such, if these scopes are used correctly, you may ignore this result.
HOW TO FIX IT
- Within UDOIT, if you click the U FIX IT! button, you will be provided with a drop menu where you are supposed to select whether The first row, The first column, or Both the first row and column should be turned into header cells. Use the View the source of this issue link in the UDOIT report to better determine the appropriate choice. Once you’ve made your choice, click the Submit button and UDOIT will apply the changes.
While we discourage the use of complex tables which have split and merged cells, if you must use them and need to identify additional header cells, please follow the directions for using the Rich Content Editor to make those adjustments.
- Within UDOIT, if you click the U FIX IT! button, you will be provided with a drop menu where you are supposed to select whether the identified header cell is a header for the column (col) or row. Use the View the source of this issue link in the UDOIT report to better determine the appropriate choice. Once you’ve made your choice, click the Submit button and UDOIT will apply the changes.
While we discourage the use of complex tables which have split and merged cells, if you have a table that must use them, you will need to follow the Rich Content Editor directions to apply the Column group and/or Row group scopes.
No Row or Column Scope Declarations Found in Table Headers
Scope declarations in headers organize and define table data by row/column for sighted and screen reader Links to an external site. users.
The file types that UDOIT Accessibility Checks for are the following:
- MS Word
- MS PowerPoint
- MS Excel
When a course is scanned, in addition to scanning Canvas web content, UDOIT Accessibility will also scan PDF and Word files for the following issues:
- Untagged PDF
PDF tags provide a logical structure that governs how the content of the PDF is presented through assistive technologies. - Older File Format
DOCX files should be used instead of DOC files. For the best compatibility and usability, consider opening this file in Microsoft Word or Google Docs and saving it as a .docx file. - Scanned File
Many scanners create only a visual copy of the data they scan, similar to an image. If the source of the scan contains text, that text in visual format cannot be read by screen readers. - Invalid File Format
This is a bit of a catch-all for any issues that arise while scanning or requesting alternates for a file. The file format may be invalid, or there may be an issue with the file that prevented us from adequately completing a scan or alternate file request.
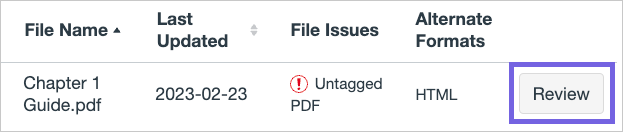
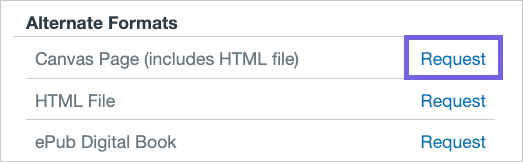
Steps to Request Alternate File Formats from the File Tab in UDOIT:
- First, click on “Review” next to the file you wish to get an alternate format for.
- Click “Request” next to the desired alternate file format.
- Wait for the file to be converted (the status will change to “Processing…”).
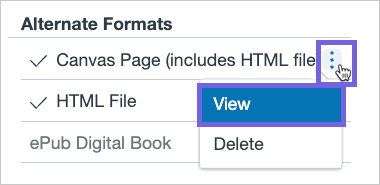
- Once complete, a checkmark will appear next to the alternative format. You can select the vertical ellipsis to view or delete it.
The new file format will be stored in a folder titled “Alternate Files” with the same name as the original file with the new file type extension at the end.
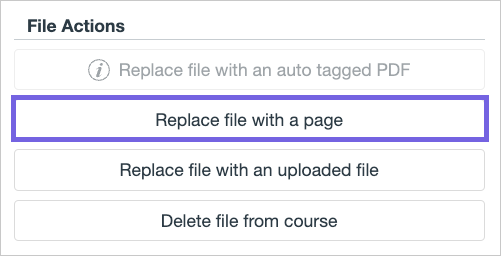
In the Review Files area, click Review. Next to “Canvas Page,” click Request. Optional: Click the “Replace file with a Page” button to replace all instances of the file in your course with the new page. Visit the video below to learn more about Converting a PDF to Canvas Page with UDOIT.
Follow these steps:
- Click the UDOIT link on your Canvas Course Menu.
- After UDOIT finishes scanning your course, click Review Files:

- Click the Review button, to the right of the file you wish to convert:
- Next to Canvas Page on the right, click Request:
- Once the page has been generated, click the three dots to the right of Canvas Page, and select View. Edit the page to make any necessary adjustments and apply accessibility considerations.
- Optional: Return to the Review Files Modal in UDOIT and select the Replace File with a Page button to have the new Canvas Page replace your original file in all content and modules.